
The sun has broken through the clouds and what was another dreary day under quarantine has turned into a wonderful late afternoon of soaking in the sun and reflecting the past 12 weeks of learning to bake croissants. Further down I'll step through these reflections in detail, but first, let's talk about what comes next.

That photograph was taken using a pinhole camera and developed using coffee and vitamin c. This is what I want to learn how to do next. Portraiture feels weird to me, so my photos will be of plants and, maybe, space! If anyone has experience with pinhole cameras, long exposure photography or home made photo developer, advice and links to advice is welcome.
To those of you who sent ideas for what I could learn next, thank you. Your suggestions will be remembered for the future.
Report back from the traveling croissants

Last week I mailed croissants out across the country and everyone got theirs in the mail. The general reaction was that my packaging worked. The bar of success I set was to have the croissants to be about as stale as those purchased at Starbucks. The consensus is that they were less stale!
One interesting thing of note, the first package to arrive went the furthest. I guess airplanes must still be flying to move the mail.
**Ingredients**

- 260g water
- 14.5g active dry yeast
- 4.5g of sugar for the water
- 520g all purpose flour
- 68.5g sugar
- 16g salt (20g is using unsalted butter)
- 50g melted butter
- 2 yolks
- 280g high fat content butter
When I first read the base recipe I wondered what mattered in this list. Clearly I needed butter, flour, and water. Did the type of butter matter? Did the type of flour? What about this list of ingredients was essential to make a croissant? I still have much to learn, but here is a run down of what I understand now.
**Flour**

Changing your flour changes everything and I don't understand how, though I partially know why. Each flours is composed of different amounts of protein and parts of the grain. This means each flour creates gluten and absorbs water its own way. I'm sure not sure how to know what will happen when looking at a bag of flour or even when talking to a local flour merchant. In the end the flour that worked well produced a dough which was a bit courser when touching it and a bit harder to roll out. I'm guessing this has something to do with having a lower protein level.
**Butter**
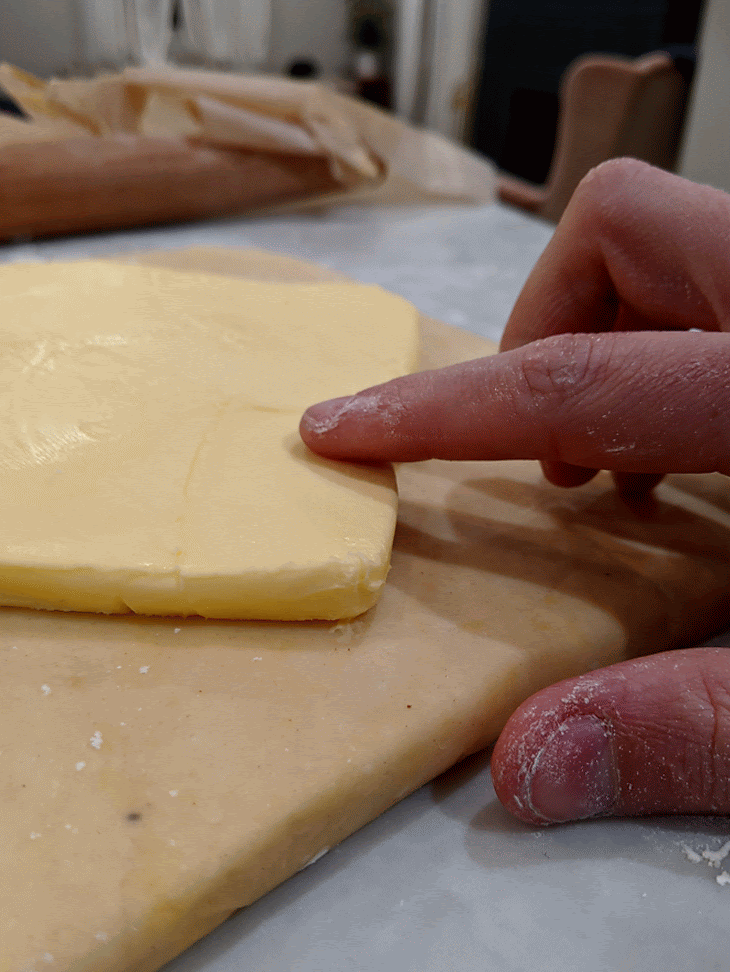
Butter matters but changing it won't break your recipe. If you can find high fat content butter your croissants will taste more like butter. If you can't, that's ok.
One mistake is trying to whip honey into your butter. This sounds cool and tastes great on bread, but lamination will fail as the butter shatters on the veins of honey in your butter block.
**Yeast**

Natural yeast, aka sourdough, adds good flavor but doesn't provide a lot of rise to your croissants. I'm guessing this is in part because the yeast is a bit weaker than conventional yeast and because you lose rise as the croissants get rolled out.
When using active dry conventional yeast blooming is very important. I've started to follow these steps for blooming as the steps in the base recipe implied that this was something that just worked and didn't take much care, an implication I found to be wrong.
The recipe has 14.4 grams of yeast. This is two red star packs. You could probably use less, but I changed the amount of yeast and my blooming process at the same time and did not try lowering the yeast afterwards. Keeping a few grams of red star around without the pack was too hard.
**Eggs**

Eggs are used twice in this recipe, in the dough as egg yolks and as full eggs in the egg wash. I've often wondered what the eggs yolks in the dough are doing. From what I've read, the egg yolk provides protein that slows the production of gluten. I got this by reading some parts of Fat, Salt, Acid, Heat but I haven't tried to test it.
One thing I've wondered is if I should remove the eggs when moving to a higher protein flour. Maybe it doesn't need egg protein ¯_(ツ)_/¯?
**Salt**

At first I used coarse grained sea salt because that is what we had. But Caitlin kept noting that it wasn't salty enough and so I moved to fine grained salt. This increased the saltiness a fair amount without requiring me to add more salt. I think this is because fine grain salt can be mixed into flour and sugar more evenly than coarse grained salt. Caitlin has noted that smaller grains of salt also has higher surface area and thus touches your tongue more. She has a fair point.
**The process**
When I tell someone about the process for making croissants they always say, "wow, that sounds like a lot of work". Really, it's not a lot of work, but it is a lot of time. If you try to get croissants done as fast as possible, maybe it would feel like a lot of work, but I've tended to do a bit here and a bit there.
A good process for me has been to make the dough on Thursday night. Roll it and shape it on Friday night. Cook on Saturday morning. This is three nights in a row and maybe you don't have that time. Thats cool. I've made good batches a few times where I made the dough on Monday and didn't roll it until Friday night. The key thing is to wrap the dough in something that doesn't breathe (aka, plastic) so that the dough doesn't dry out. And, if it does dry out, it will be ok. Normally only the top dries out as the fridge shelf will keep the bottom moist. If the top dries out, make sure its the part that touches the butter when encasing the butter in the dough so that you are rolling the moist dough.
**Mixing the ingredients**
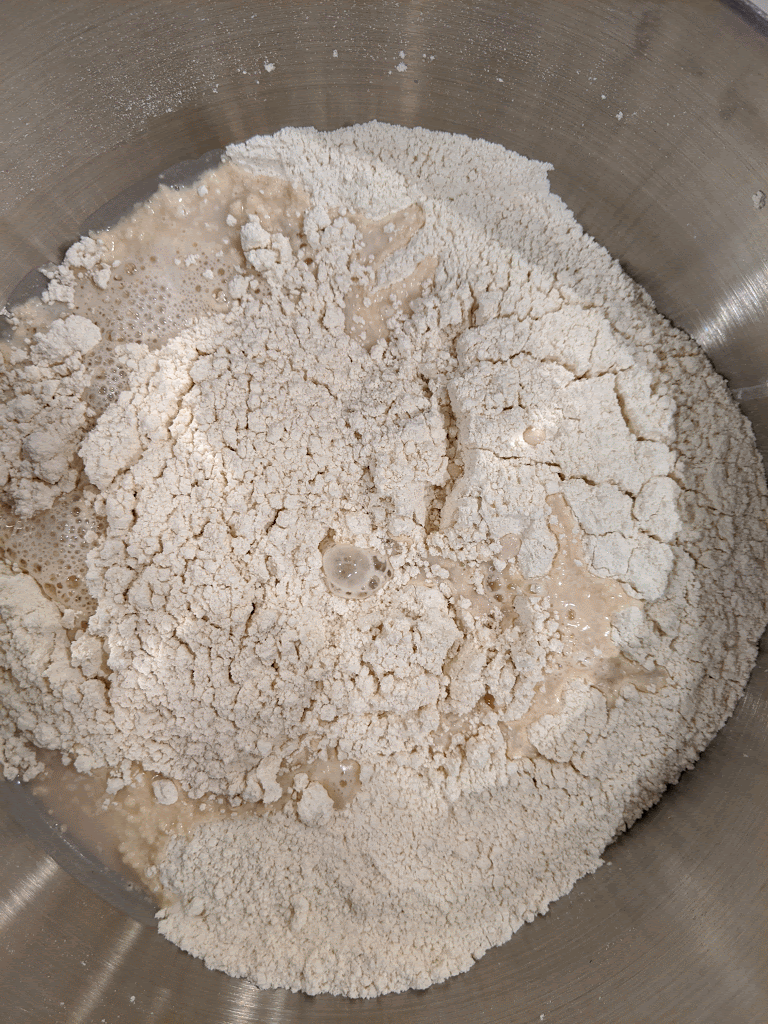
The key thing when making the dough is to use a scale. To be honest, I didn't try anything else. Every article I read said this. Some instructions you don't question.
I always weigh the water and yeast first when making a dough. This way the yeast blooms while I do the rest. After that I measure the dry ingredients and mix them together with a whisk. Then I measure the wet ingredients and pour them into the dry. When the yeast is done blooming, I add it and use a wooden spoon to stir.
Starting with a whisk and then moving to a wooden spoon might seem weird but a whisk cannot mix the dough and a wooden spoon makes a bit of a mess trying to get the sugar and salt equally spread amongst the flour.
**Kneading the dough**
The dough will take time to pick up all the dry ingredients. This is good as you are trying to make a moist, slightly tacky dough. To get the dry ingredients mixed in, I form the dough into a ball and press it together with my palms. This lets me knead over the bowl and press it into the bowl to pick up dry ingredients as I feel the dough moisten.
Once all the dry ingredients are picked up, I form the dough into a six inch long log and slam it against the counter. I know, this is weird. It's what the guy in the base recipe video did and it works. I'm sure it's not required, but so much of this part is about feeling the dough become "smooth" and for me that means trying to do the same thing each time so that I can watch the dough change predictably in my hands.
Last note about kneading. I have no clue what "smooth" means still. My understanding of the word smooth is more like marble smooth or melted ice cream smooth, not "this will stick to you a bit smooth". So, for me, really smooth is what pizza dough looks like if you've ever bought pizza dough pre-cooked from a grocery store. For croissants we just want normal smooth, so the surface of the dough should have more texture than pizza dough but not a lot. Maybe, someday in the future, I'll rant in this newsletter about words failing us. This is a good case of where I think they do. I guess "smooth" is as good as we can do.
**Shaping**

I think I did an ok job talking about how to shape in this newsletter so look to it for details on how to shape. For dimensions, I've landed on rolling my dough into a 9.5 inch square and for butter I do a 4.5 inch square. This makes a slightly tall block of butter. I think this is good as it means folding is a bit more forgiving (think about repetitive division).
Once your dough is shaped, wrap it up and let it rest of 12 hours. You can do a bit less than 12 hours. I did 9 a few times and it was ok. If the dough doesn't rest long enough it won't roll well. Again, as long as you keep the dough moist, I don't think you need to stop resting it at any particular time after 12 hours though the yeast might eventually go dormant again.
I wouldn't shape your butter more then an hour before encasing it in the dough. It gets too hard in the fridge and you don't want really hard butter, it will break into chunks when you roll it out later.
**Encasing**

This is a pretty simple step. You take the dough, roll it out a bit to loosen it up and that wrap it around the butter. I aim to have a 6.5 inch block when I'm done encasing. Make sure the seams are solid. If they are not, they will break when doing the folding. I've thought they were solid many times to still have them break on a fold. This is pretty likely to happen if your dough is too dry. That said, don't fret too much. Leaky butter is sad, but it's not the end of the world.
Once the butter is encased in the dough, I use the rolling pin to try and move the butter to the corners. This hasn't worked too well and I often break the butter into chunks trying to do it. Maybe I should stop. I haven't stopped so, if you do, you're venturing into territory I've yet to cross.
**Folding**

There are many types of folds. You can google them. I've only tried the letter fold as it makes 27 layers after three folds and that sounds like a good amount of layers to me. If you are looking to cut time, two folds of the book fold will give you 16 layers which is probs enough.
Folding is best done when the butter is supple but not close to melting at all. One article that demonstrated the right butter temperature by pushing a finger into the butter, pulling it away, and showing no butter stuck on. This was a good but not great teaching lesson for two reasons. 1) While the video showed the finger made a dent, I'm not sure how hard they pushed. 2) When doing the folds, you can't touch the butter, it's in the dough. For these reasons, I have no clue how to tell if butter is ready to be rolled. I've been keeping the dough in the fridge for 40 minutes and taking it out for 10 before rolling. I made that up. It works most of the time in my kitchen in late winter at around 68 degrees room temp. AKA, it might not work for you. Maybe try letting hard butter warm up on your counter while you regularly prod it with your finger?
When folding you want to end with the same size block you started with. With the letter fold, this means tripling the size in one direction each fold and then, wait for it, folding the dough back over itself. For my 6.5 inch block, I tend to target 20 inch sheet before folding it back.
A big part of rolling is how easy the dough will stretch. If you try to roll it out and it won't budge, or it shrinks back, you have a problem. Not the, toss it out and start again kind of problem, but a problem still. Letting the dough rest in the fridge for a few more hours has helped me a few times here. Letting the dough warm up has helped as well, though this has the risk of melting the butter.
Another big part of rolling the dough is being careful not to force it. If you force the dough to get thinner you are likely using your strength to blend the butter into the dough which destroys the layers.
**Shaping**

Once the dough is done being folded it will need to rest again. I tend to wait another 40 minutes just like a fold. Again, you could wait a few days here. Rushing is not the key. If waiting a while seems crazy, know there are companies who ship good croissants around the world in this state.
Shaping a croissant is making a sheet of dough, cutting into long triangles and then rolling those triages from the base to the tip. The recipe I've been following suggested that the base of the croissant should be 4.5 inches. I try to make 10 croissants a batch so I roll my dough our to 23 inches and then I make the dough wider until thickness of the dough is about a quarter to a half an inch. This is a bit different then the advice I found online which suggested that the length of the sheet of dough should not be your target but rather the width. The reason I left this way of thinking was that I liked making about the same number of croissants and the other method kept giving me different numbers.
There is more to say here, but I didn't really find any secrets.
**Proofing**
This was the hardest part, maybe because I was working with unblocked yeast, but still, this took time to learn. It starts with a simple egg wash. I tried egg white only one time and it wasn't right, use the whole egg.
The only way proofing worked for me was to put the croissants in the oven and prop the door open with a dish towel. The slightly opened door keeps the oven light on and lets the air flow out so it doesn't get too hot. This was recommended to me early on and it seemed weird so I tried other options I found online. Those didn't work. This did.
No mater what you do for proofing, don't let the temp get above 78 degrees for more than a few moments. Butter starts to melt around 78 degrees and you want that butter to stay solid for a few more hours.
Also, proofing takes time. Lots of time. The base recipe said four hours. I found ten was more like it. Your distance might very. You are looking for your croissants to double in size. Double. In. Size. When this happens you may get a good smell of yeast in your house. It's a great thing to wake up too.
Because this takes so long and because croissants in the AM seems right, I tended to let them proof all night from about 10pm until 8 or 9am. When they are done, put on another coat of egg wash.
**Baking**
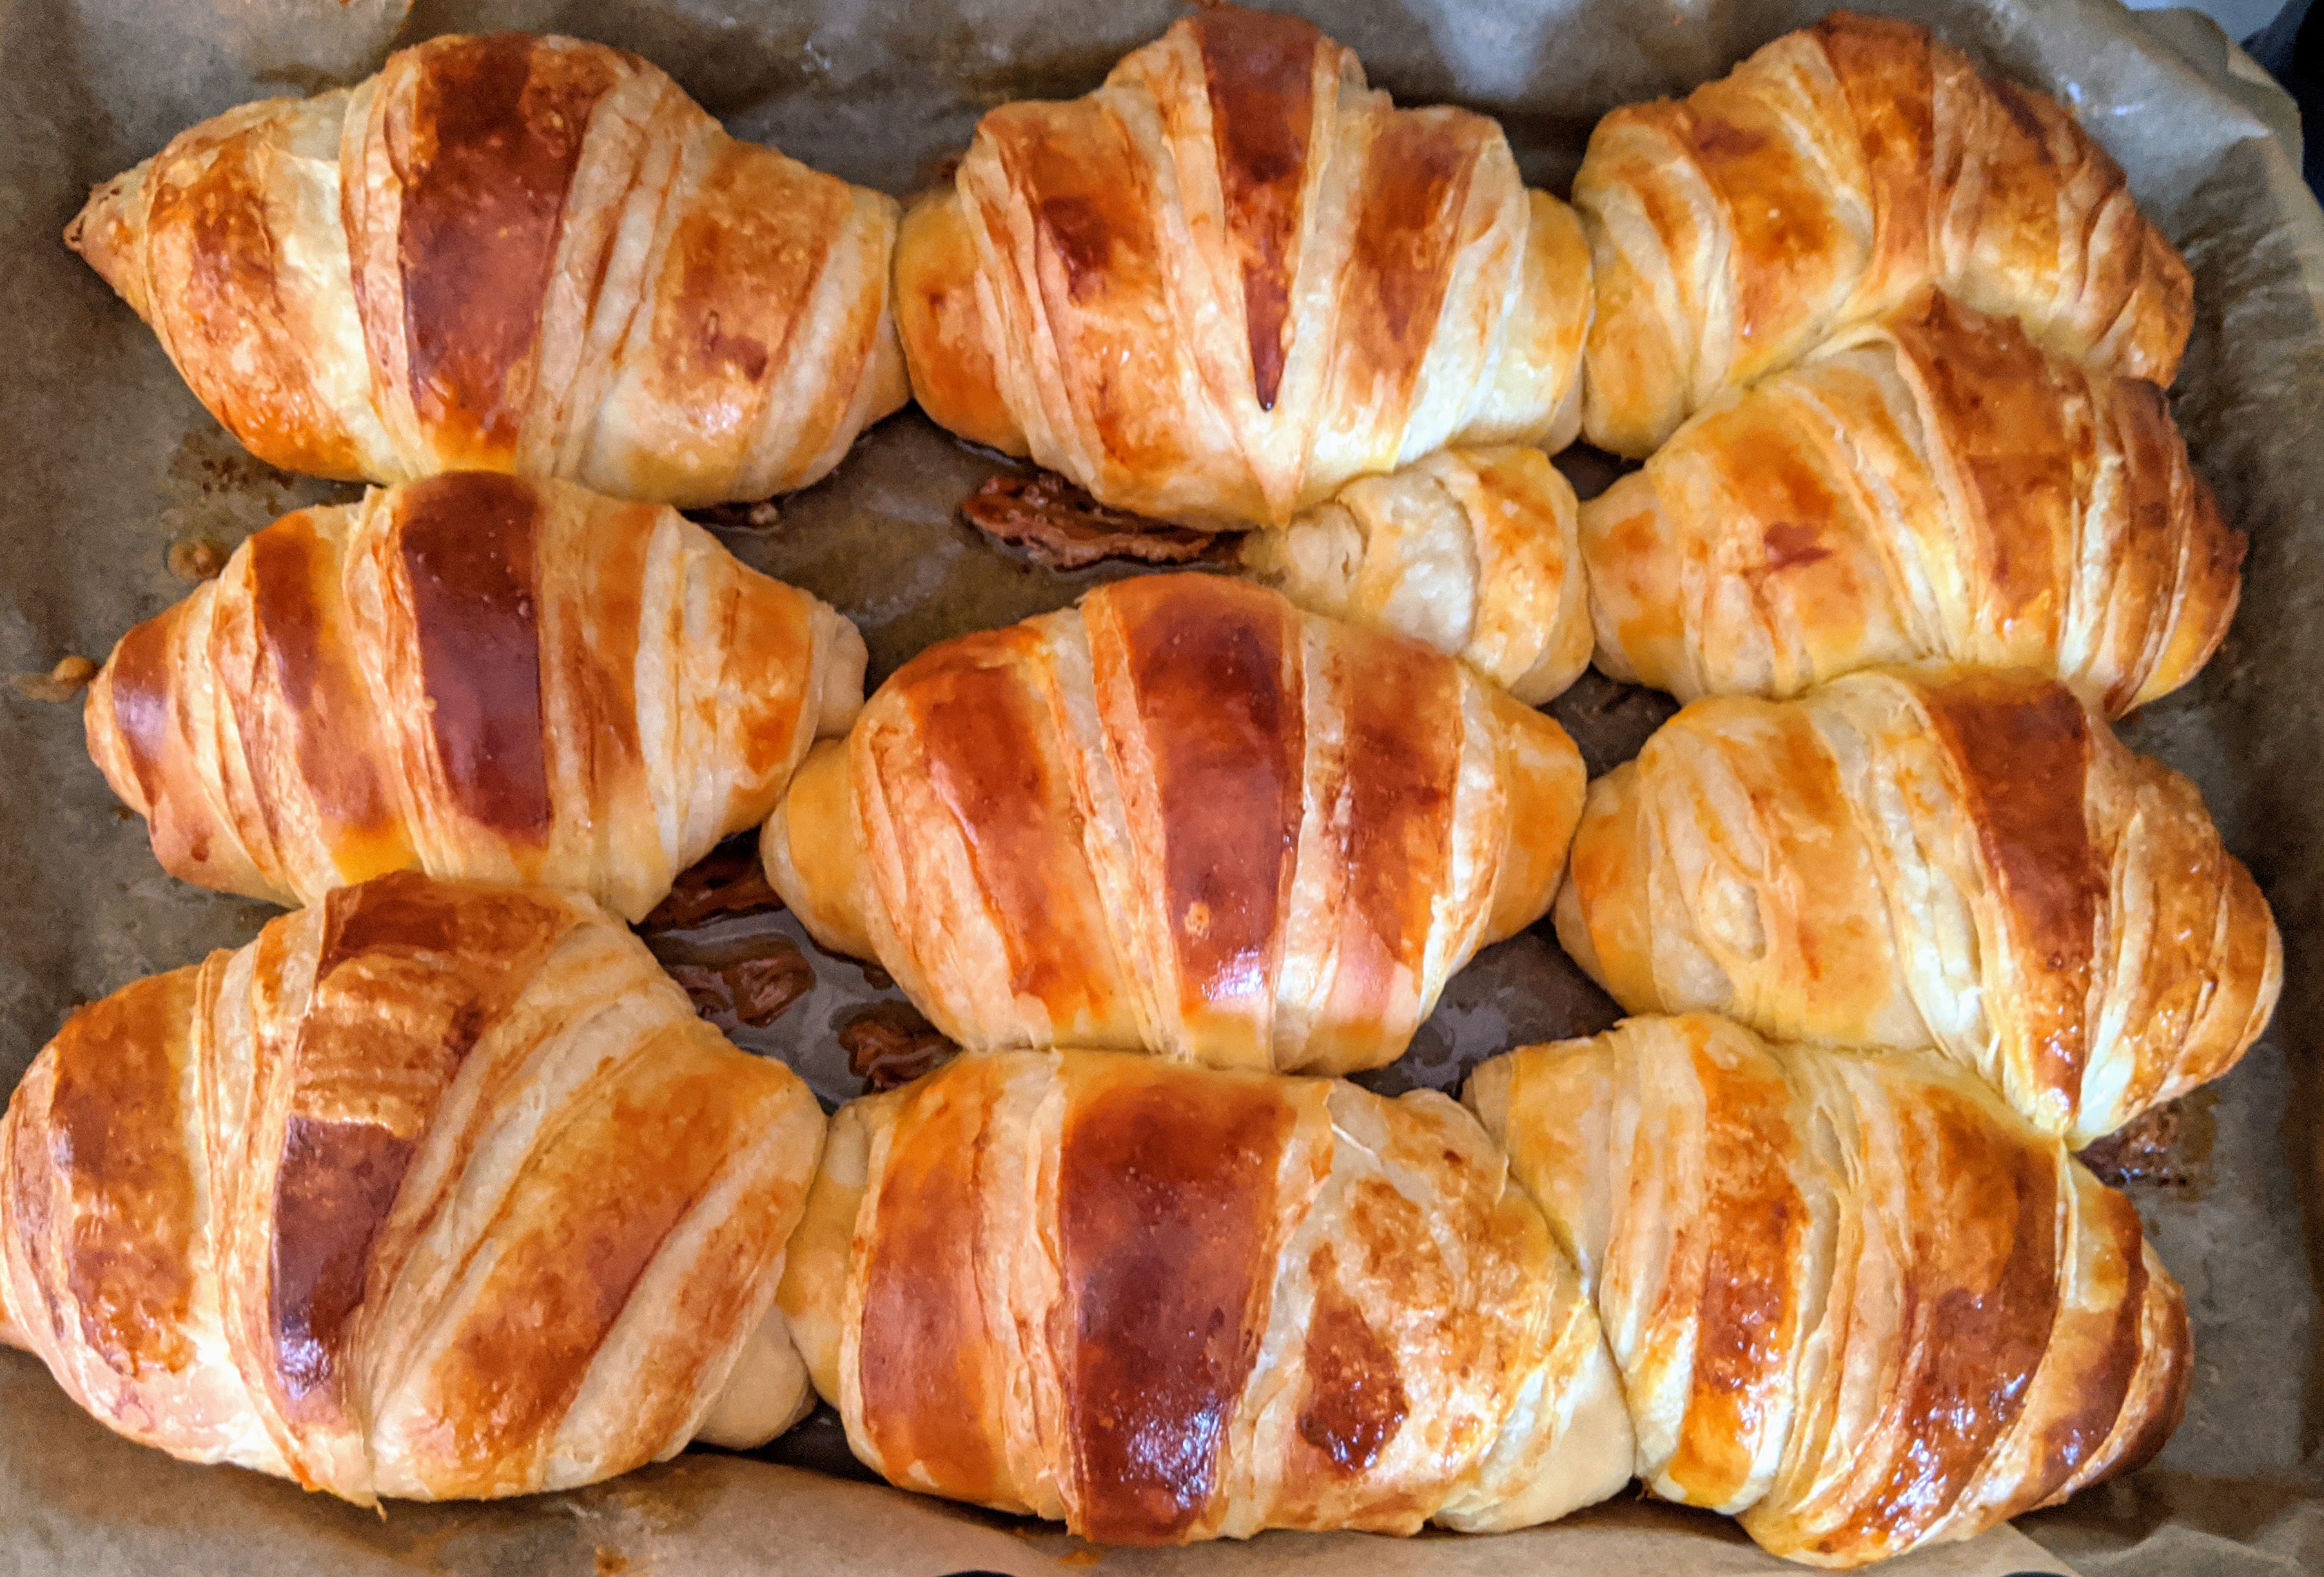
Heat your oven to 390 degrees for 6 minutes followed by 330 degrees for 12 minutes using the convection bake setting. If you don't have a convection bake setting, try splitting the difference and using a constant heat. If they take longer than this, your croissants didn't rise enough or lamination didn't work. Thats cool, just keep them in and they will be come crescent rolls. Warm, buttery, crescent rolls.
The big thing about baking is watching the butter melt out of your croissants. You don't really want this to happen too much but it will happen. The idea of starting at 390 and moving to 330 is that you heat the dough up quickly and then turn it down so the butter melts less. I found this really works. That somehow dropping 60 degrees while still staying above the melting point of butter does slow the melting process down a fair amount.
A croissant is done when it feels rather light for its size and looks golden brown. If it doesn't feel light, its not cooked enough inside. I'd let them cook a bit more and hope your oven temps we're quite right.
**:wave: croissants**

OK. Well, that is more or less all I know about how to make croissants. I'm not sure I got all the timings clearly documented. Take it slow, keep your butter cool (not cold) and it will be fine. Or, worst case you'll have some tasty bread-thing at the end of it. Anything that can accept jam is a good consolation prize.
I look forward to writing about pinhole photography next week. I haven't taken a photo on film in close to two decades so this will be fun and yes, by fun, I mean full of failure and learnings.
Thanks for reading, Matthew